Open 7 days: Mon to Sat 7am to 9:30pm, Sun 9am to 9pmLicensed and insured, MHIC #1459775921 Moravia Park Dr b6, Baltimore, MD 21206
TopStone Granite

Our Countertop Templating and Installation Process in Baltimore

TopStone Granite fabricates and installs granite, quartz, marble, quartzite and butcher block countertops for homes and businesses across the Baltimore area. Every project follows the same seven steps, from the first measurement to the final walkthrough.

We have refined this process over 15+ years and 650+ completed jobs. It exists for one reason: stone is cut once, so every measurement, decision and approval has to happen before the first cut.

Below is what happens at each step, what we need from you and how long it usually takes. We are licensed and insured under MHIC #145977.

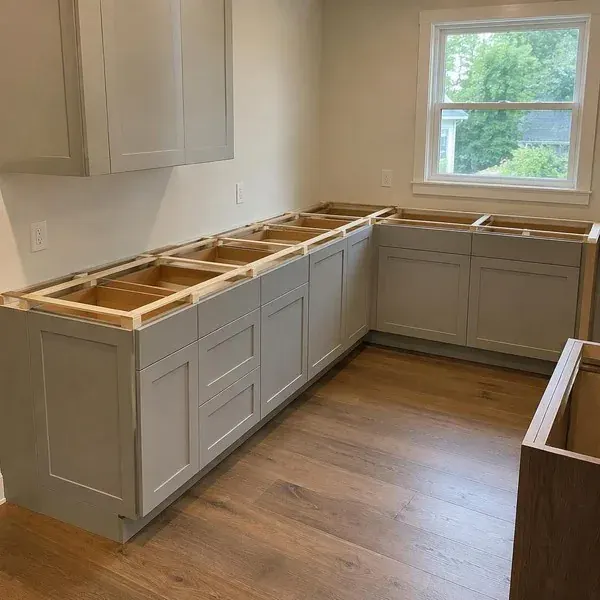
Countertop templating frame resting on empty base cabinets during measurement for a Baltimore kitchen
Licensed and insured
MHIC #145977
  • 15+years fabricating and installing
  • 650+countertop jobs completed
  • 7 daysopen every day of the week
  • Localshop on Moravia Park Drive, Baltimore

Step 1: Estimate and Measurements

The first visit is a conversation as much as a measurement. We look at your cabinets, walls, existing countertops and access to the room, then talk through material, edge profile, sink style and any custom details. Most estimate visits for a single kitchen take about an hour.

Have these ready if you can:

  • Sink, faucet and cooktop model numbers or spec sheets
  • Any appliance changes, such as a wider range or a relocated dishwasher
  • Cabinet and floor colors, as photos or samples
  • Notes on access: stairs, tight turns, parking and the path from the curb

You get a written quote that spells out material, edges, cutouts, removal, installation and anything that is not included.

Step 2: Choosing Your Slab

Granite, marble and quartzite are natural stone, so no two slabs look alike. We encourage you to see the actual slab, or clear photos of it, before it is cut.

For veined stone, we show you where seams will fall and how the pattern runs across islands, corners and waterfall edges. Approving this layout up front means no surprises on installation day.

Quartz and butcher block are more uniform, so selection is mostly a color and finish choice from samples. Ask which brands and colors we can source for your project.

Step 3: Templating

Templating is the exact, full-size measurement of every countertop run. It records out-of-square walls, wavy plaster, cabinet overhangs and fixture locations more precisely than a tape measure can.

Your countertops are cut from this template. Its accuracy decides how tightly the stone meets your walls and how well the sink and cooktop line up with their cabinets.

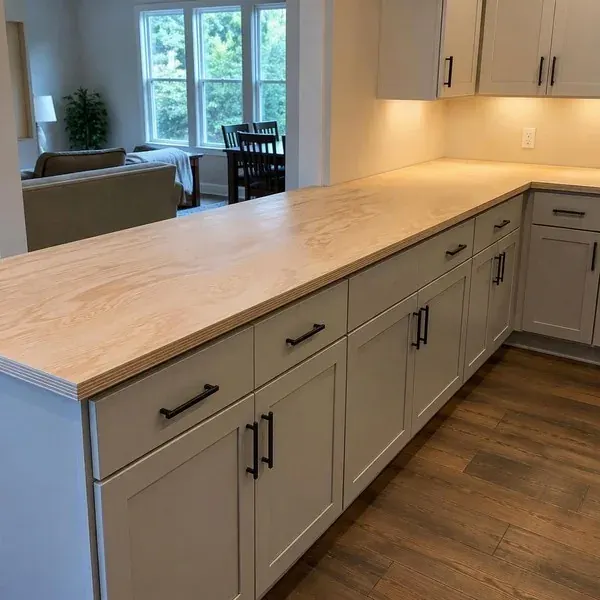
Plywood strip countertop template laid across kitchen cabinets to capture exact wall lines before fabrication

What Must Be Ready Before We Template

  • Base cabinets installed, fastened and level
  • Sink, faucet and cooktop on site, with model numbers
  • Farmhouse or apron-front sinks already set in their cabinet
  • Slide-in ranges and dishwashers on site, or their spec sheets on hand
  • Counters cleared and a clear path to the room

If cabinets move after templating, the template no longer matches and may need to be redone.

Can We Template Over Your Old Countertops?

Often, yes. For a straight replacement on the same cabinets, we can usually template with the old tops in place and remove them on installation day. Your kitchen stays usable while the new countertops are fabricated.

If you are changing the cabinet layout, sink size or overhangs, the old tops may need to come off first. We tell you at the estimate which approach fits your job.

Step 4: Fabrication

Once the template and slab layout are approved, your countertops are cut, edges are shaped and polished, and sink and cooktop cutouts are made. Details like drainboard grooves, inlays and mitered waterfall panels are built at this stage too.

At most shops, fabrication takes one to two weeks after templating, depending on slab availability, complexity and the season. We confirm your fabrication timeline at the estimate and again after templating.

We follow OSHA's respirable crystalline silica standard when we cut and finish stone. If you are curious about the details, our about page explains how we approach dust safety.

Step 5: Removing Your Old Countertops

On installation day, the old countertops come out first. Laminate usually lifts off in sections, while stone tops are cut free of their adhesive and carried out in pieces.

The biggest risk during countertop removal is your backsplash. Tile set directly on the old counter often cracks or pulls away when the counter is lifted, so plan on repairing or replacing at least the bottom row.

Sink and dishwasher plumbing has to be disconnected before the old tops come off. Your quote states who handles the disconnect and whether haul-away of the old countertops is included.

Step 6: Installation Day

Most kitchen installations take one day, with larger or more complex projects running longer. We set each piece, check it for level, join and polish the seams and mount the undermount sink.

Expect some noise from cutting and grinding, steady foot traffic through your entry and a little dust, which we contain and clean up before we leave.

Can You Use Your Kitchen During Installation?

Not during the install itself. Plan on no sink or cooktop for the day and set up a coffee and snack station in another room.

Undermount sink adhesive needs time to cure before the plumbing goes back on, which can mean a short wait for a working sink. Go easy on new seams and overhangs for the first day as well.

Step 7: Plumbing Reconnect, Sealing and Walkthrough

After the sink adhesive cures, the faucet, drain and disposal are reconnected. In Maryland, plumbing must be done by a licensed plumber, and your quote states who handles the reconnect.

Natural stone such as granite, marble and quartzite is sealed to help it resist stains. Quartz does not need sealing, and butcher block is oiled instead.

Before we leave, we walk the job with you, checking seams, edges, the sink mount and cleanup, and go over how to care for your material. Our warranty page explains what is covered after installation, and our stone sealing and polishing service keeps natural stone in shape for years.

How Long the Whole Process Takes

Across the industry, template to installation commonly runs about one to three weeks, plus the time you spend choosing material. Here is how a typical kitchen breaks down.

Step Typical time What you do
Estimate One visit Have fixture specs and access notes ready
Slab selection Up to you Choose material, approve the slab and layout
Templating One visit Have cabinets set and fixtures on site
Fabrication Often 1 to 2 weeks Nothing, unless changes come up
Removal and installation Usually 1 day Clear counters and cabinets, plan for no kitchen
Plumbing reconnect and walkthrough Same day or next day Walk the job with us

What slows things down: cabinets that are not ready or not level at templating, fixture changes after the template, special-order slabs and complex custom work. We give you your own project timeline at the estimate.

Request a quote

Start Step One

Book your estimate and we will measure, talk through materials and give you a written quote. Call, use the form below or stop by the shop on Moravia Park Drive, seven days a week.

Call (667) 400-3297
Call (667) 400-3297Quote